

Photographers spend hours crafting their work—from scouting and composing to editing and exporting. But if your photo backup strategy is an afterthought, you’re only one hardware failure or accidental deletion away from losing it all. In honor of World Backup Day, it’s time to build a routine to back up your photos that actually protect your Lightroom catalog and your hundreds of thousands of image files. This guide is everything I wish I had known when photography started becoming a serious hobby. And hopefully, this guide is helpful for those who don’t consider themselves tech experts.
How to Back Up Your Photos Table of Contents
- Backing Up Your Lightroom Catalog: Why it Matters & How
- The 3-2-1 Backup Strategy for Photographers
- Photography Backup Drives Explained: HDD vs SSD, DAS vs NAS, and RAID Systems
- What Storage Solution Works Best for Different Photo Library Sizes?
- Cloud Backup for Photographers: Why I Recommend Backblaze
- How Often to Replace Backup Hardware
- Photo Backup Tips for Traveling Photographers
- Final Thoughts on Protecting Your Photography Work
Backing Up Your Lightroom Catalog: Why it Matters & How
Many photographers think backing up their images is enough. But if you use Adobe Lightroom, your Lightroom catalog holds all the information about how your photos are organized and edited. The catalog contains metadata, virtual copies, collections, and every slider move you’ve made in the Develop panel editing your photos. If your catalog becomes corrupted or is lost, all that creative work disappears—even if your image files are still safe.
The safest and smartest way to back up your Lightroom catalog is to let Lightroom do it for you. Enable automatic backups under Preferences > Catalog Settings > General and choose to back up Every Time Lightroom Exits. Lightroom will then prompt you when closing, giving you the option to back up or skip it for that session. This gives you flexibility while building consistent habits to back up your photos.
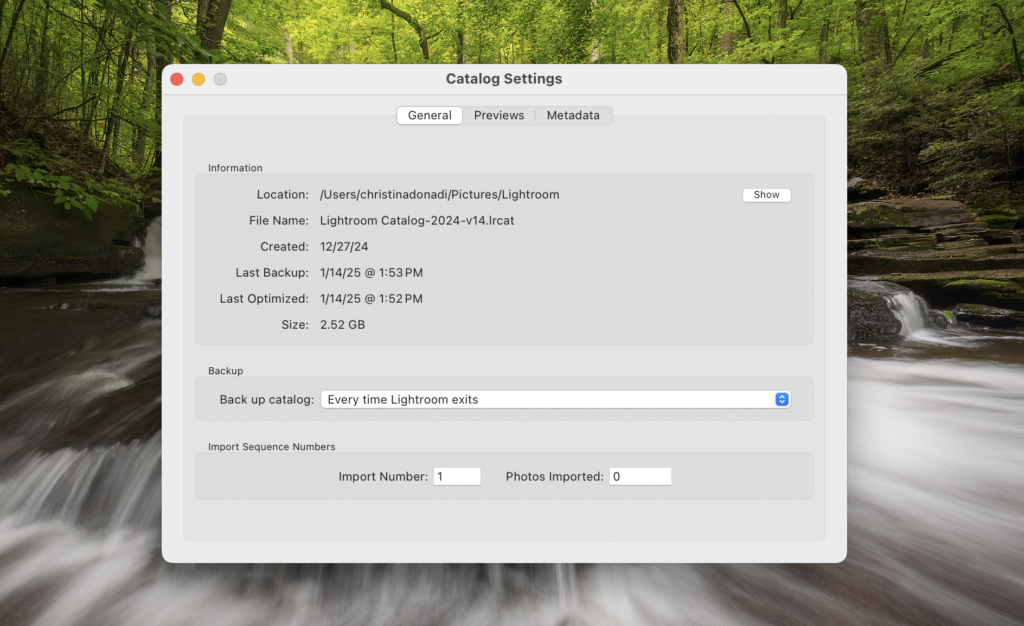
When that prompt appears, be sure to check both the “Test integrity before backing up” and “Optimize catalog after backing up” boxes. These run a quick health check and help keep your catalog running smoothly.

In general, it’s best to keep your Lightroom catalog on your computer’s internal drive and your image files on an external hard drive. However, if you regularly work across multiple computers, you may prefer to keep your catalog on an external drive for portability. Regardless of where your main catalog lives, make sure the catalog backups are saved to a different physical drive. If both your catalog and its backup are on the same drive and that drive fails, neither will be recoverable.
As a best practice, periodically clean out older catalog backups to free up space. Keeping the latest three to five versions is typically enough.
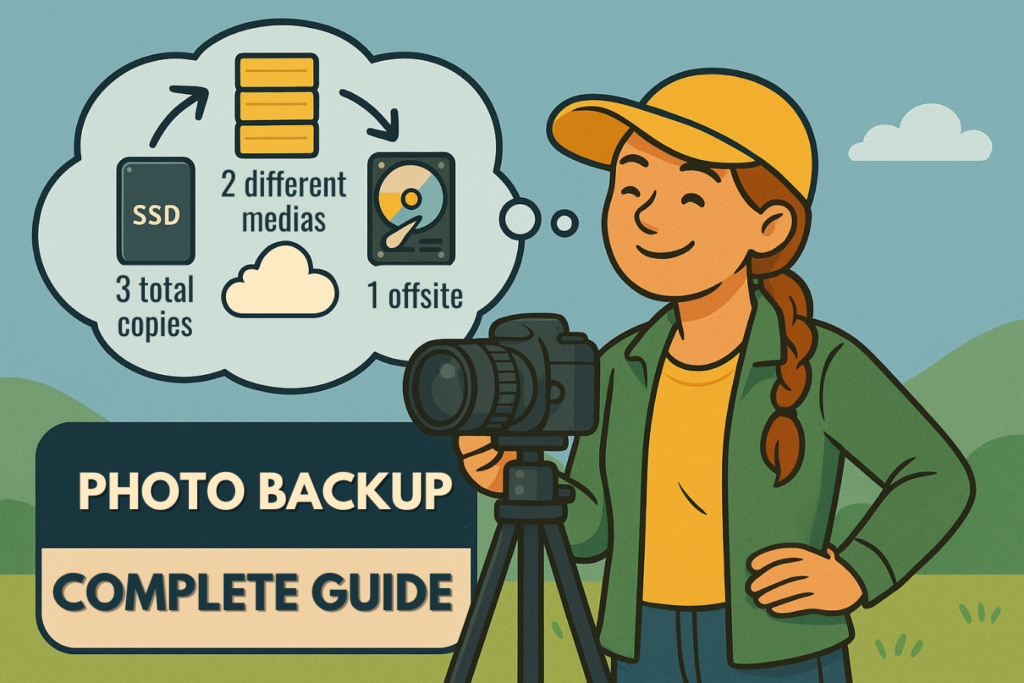
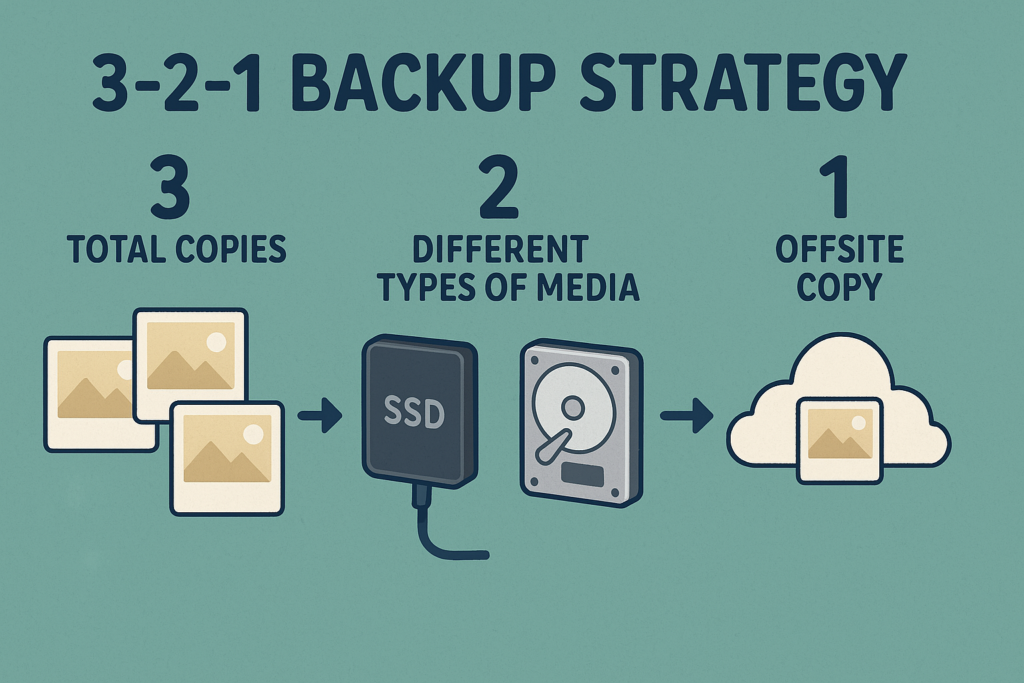
The 3-2-1 Backup Strategy for Photographers
The 3-2-1 photo backup strategy is widely regarded as the gold standard for data protection, and for good reason—it builds in layers of security that guard against everything from accidental deletion to catastrophic hardware failure. At its core, the 3-2-1 method is simple:
3 total copies of your data, stored on 2 different types of media, with 1 copy kept offsite.
Let’s break that down and see what it actually looks like for photographers.
- You start with your primary copy—this is the working version of your photo library, where you import, cull, and edit your images. Most photographers keep this on their main computer or a fast external SSD.
- Next, you create a secondary copy of those files. This could be a separate external hard drive, a RAID array, or another local storage device that you mirror regularly. This second copy protects you if your primary drive fails, but it’s still in the same location, so it doesn’t protect against theft, fire, or natural disaster.
- That’s where the third, offsite copy comes in. This version is stored in a completely different physical location—often in the cloud, using a service like Backblaze. If something happens to your studio or home, your offsite backup ensures you can still recover your files.
Why is it important to have two different types of media? It comes down to redundancy and failure points. If you’re backing up both your original files and your copy to the same brand of external hard drive, plugged into the same power strip, in the same room—you’re not actually protecting your data. Power surges, floods, or hardware faults could take out everything at once. By diversifying where and how your backups are stored, you drastically reduce that risk.
The 3-2-1 strategy also protects against human error, which is often overlooked. Accidentally delete a folder? It happens. If your drives are mirrored and that deletion syncs across both, your offsite copy can be the last line of defense.
This system isn’t about paranoia—it’s about preparation. Backing up once is good. But backing up in a structured way that accounts for multiple failure points? That’s what keeps your work safe in the long run.
Understanding Photo Storage: HDD vs SSD, DAS vs NAS, and RAID Explained
When it comes to storing and backing up your image files, not all drives and systems are created equal. Some are better for speed, others for long-term safety. The right setup often depends on two things: how much data you have and how comfortable you are with technology. This section breaks down the different types of drives and storage configurations—what they are, why they matter, and which options make the most sense depending on your photography needs.
Understanding Photo Backup Drives: What Are HDDs and SSDs?
Let’s start with the foundation: the actual drives where your photos live.
HDDs (Hard Disk Drives) use spinning platters to store data. They’ve been around for decades and offer high capacities at a low cost. This makes them ideal for large photo archives, especially when speed isn’t your top priority. This makes it a great choice for a drive that stays on your desk and isn’t moved often.
- Best for: Long-term backups and archived photo libraries
- Example: A 10TB external HDD to store years of RAW files
SSDs (Solid State Drives) use flash memory and have no moving parts. They’re faster, lighter, and more durable than HDDs, but more expensive per terabyte. They shine when speed and portability matter—like culling or editing on the go.
- Best for: Travel drives, working files, and fast imports/exports
- Example: A 2TB portable SSD for current projects and field use
Which should you use?
Most photographers benefit from a combination of both. Use an HDD for larger, more economical photo backup or archive storage. Use an SSD for speed and active work.
The Diversity Advantage
Here’s a pro strategy most photographers overlook: diversify your backup hardware. While all drives can potentially fail, using multiple manufacturers can protect you from systemic manufacturing issues. Imagine if one brand experiences a widespread production defect—by using drives from Western Digital, Seagate, and Samsung, for example, you’re hedging your bets. This approach adds an extra layer of protection to your photo backup strategy, reducing the risk of simultaneous failures that could wipe out your entire photo library.
DAS vs NAS: Choosing How You Access Your Photo Files
Now that you understand drive types, let’s look at how those drives connect to your system.
DAS (Direct-Attached Storage) is exactly what it sounds like—a drive that plugs directly into your computer via USB, USB-C, or Thunderbolt. No network setup required.
- Ideal for: Solo photographers and anyone who prefers plug-and-play simplicity
- Why it works: Lightroom plays nicely with DAS systems because it can easily read and write to locally attached storage. There’s no lag or permission issues like there can be with networked devices.
NAS (Network-Attached Storage) is a bit different. Instead of plugging directly into your computer, NAS units connect over Wi-Fi or Ethernet and act like a private server in your home or studio.
- Why NAS sounds appealing: You can access your files from multiple computers or even remotely, and some NAS systems offer redundancy with built-in RAID options.
- Why NAS is tricky with Lightroom: You can use Lightroom with a NAS, but you can’t store the Lightroom catalog on the NAS, only the image files. You’ll need to keep the catalog on a local drive, while the images can reside on the NAS. Additionally, Lightroom does not perform well when accessing catalogs or files over a network. It expects low-latency access to your files, which NAS often can’t provide. Things like preview rendering, scrolling through thumbnails, or saving edits can become painfully slow or unstable.
Bottom line: If you’re using Lightroom, it’s best to avoid storing your catalog on a NAS. You may be able to store image files there, but performance issues often crop up. DAS is far more reliable and user-friendly for most Lightroom workflows.
What is RAID? Understanding Redundancy and Parity
RAID stands for Redundant Array of Independent Disks, and it’s a method of combining multiple drives into a single logical system. Different RAID levels offer different tradeoffs between speed, capacity, and protection.
Here are the most relevant RAID levels for photographers:
- RAID 0: Combines two or more drives for speed (striping). Fast, but if one drive fails, all your data is lost. Not suitable for backups.
- RAID 1: Mirrors one drive onto another. If one fails, the other still has your files. It’s easy to set up and a solid option for added protection.
- RAID 5: Uses three or more drives with one reserved for parity (recovery data). It offers both speed and fault tolerance. RAID 5 can withstand one drive failure, but during a rebuild, if a second drive fails—or if there are read errors on other drives—the array can become unrecoverable.
- RAID 10 (1+0): Combines the redundancy of RAID 1 and the speed of RAID 0. Requires four or more drives and offers high performance and protection—at a higher cost.
What is parity?
Parity is a form of backup math. In RAID 5, parity data is distributed across all drives, allowing the system to reconstruct lost data if a drive fails. But parity rebuilds can take hours—or days—depending on your array size.
Understanding RAID: Redundancy vs. Backup
An important caveat: RAID is a redundancy strategy, not a backup solution. While RAID protects against hardware failure by keeping multiple copies of data on different drives, it does not protect against:
- Accidental file deletion
- Ransomware or malware attacks
- Software corruption
- Human error (like accidentally overwriting files)
- Catastrophic events like theft or fire
A true photo backup strategy requires keeping separate, independent copies of your data in different locations. RAID can be part of your data protection approach, but it should not be your only line of defense. Always maintain additional backups, including an offsite or cloud backup, to ensure comprehensive protection of your photographic work.
Best option for non-tech-savvy users: A DAS (external hard drive) with RAID 1 or RAID 5, especially one that comes pre-configured or uses software like OWC SoftRAID, offers a great balance of protection and ease of use. It provides redundancy without the complexity of managing a NAS.
What Storage Solution Works Best for Different Photo Library Sizes?
The storage setup you need depends heavily on how big your image library is and how often you access it.
If your image library is under 2TB:
You don’t need anything overly complex. A simple setup like this works well:
- A 2TB SSD for your active Lightroom catalog and recent images
- A 4TB HDD for backing up your image files—whether manually or using a tool like Time Machine or Carbon Copy Cloner (with Lightroom handling the initial catalog backup separately)
- A cloud backup (like Backblaze) for offsite protection
This is clean, affordable, and easy to manage—ideal for most hobbyists or part-time pros.
If you have 8–16TB or more of photos:
You’re moving into power-user territory. Speed, reliability, and organization all become more important.
A typical setup might include:
- A multi-bay DAS enclosure (like the OWC ThunderBay) with RAID 5 for your main image library
- A second DAS or external drive to clone your first one as a local backup
- A cloud service to mirror either your active library or your best-of selects
You might also consider adding a dedicated working SSD for current projects and only dipping into your large RAID storage when needed.
If you want the smoothest Lightroom experience, go with a DAS setup. Use SSDs for speed, HDDs for volume, and add RAID only if you need extra protection. Leave NAS solutions to studios, network-savvy users, or workflows that don’t rely heavily on Lightroom.
Are you unsure what size hard drive you need for your photography?

This article discusses how I estimate what size hard drive to purchase for your photo library.
Cloud Backup for Photographers: Why I Recommend Backblaze
Offsite backups are a critical part of any photographer’s data protection strategy, and cloud storage offers one of the easiest and most reliable solutions. I recommend Backblaze because it consistently delivers peace of mind—at a very reasonable price.
For $99/year, Backblaze (affiliate link) provides unlimited cloud storage and can automatically backup both your internal drive and any connected external drives. It retains deleted files for up to one year and offers flexible restore options, including downloading files or having a hard drive shipped directly to you.

It runs quietly in the background and updates your photo backup automatically as long as your drives are connected. If it hasn’t seen one of your drives in a while, Backblaze will alert you—a great reminder to keep everything current.
Yes, the initial upload can take time (especially if you have slower internet or large amounts of data), but once it’s done, the incremental updates are fast and effortless. Your Lightroom catalog, image files, and even documents or project folders are all covered.
And this isn’t just theory. I know multiple professional photographers whose photo libraries were recovered thanks to Backblaze. (affiliate link) That’s the kind of real-world protection that makes Backblaze an essential layer in my own workflow. It’s affordable. It’s automatic. And it’s saved more than a few people from disaster.
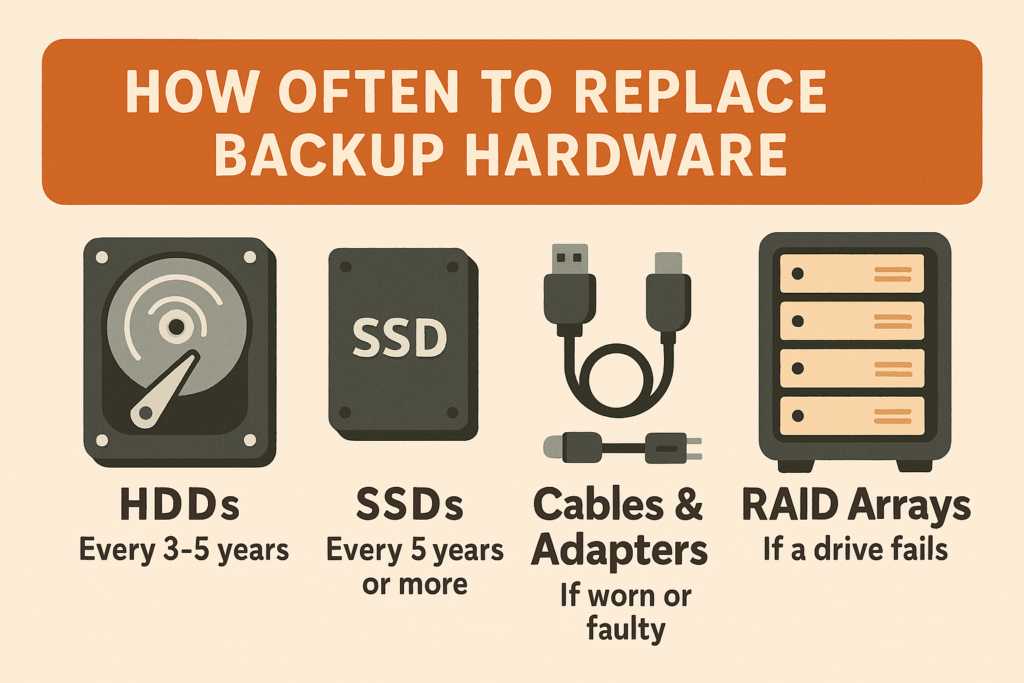
How Often to Replace Photo Backup Hardware
Drives don’t last forever. Whether you’re using an external SSD, HDD, or a RAID array, it’s not a matter of if a drive will fail—it’s when. That’s why recapping or replacing your drives on a regular schedule is a smart, proactive part of any long-term photo backup plan.
How often you replace drives really depends on your risk tolerance. Some photographers like to push their gear to the edge, while others prefer to swap hardware on a schedule to minimize the chance of surprises. If you’re the cautious type (or working with irreplaceable files), lean toward the lower end of the replacement range.
Here are some general guidelines:
- HDDs (Hard Disk Drives): Replace every 3–5 years, or sooner if you notice performance issues, clicking sounds, or other error messages.
- SSDs (Solid State Drives): Typically last 5 years or more, but keep an eye on performance. If an SSD starts to act unpredictably (like file corruption or frequent disconnections), it may be nearing the end of its life.
- Cables and adapters: These are easy to overlook but can be failure points. Replace if they show signs of wear, fraying, or inconsistent connections.
- RAID arrays: If a drive fails, replace it immediately—but also consider proactively replacing all drives in the array once one goes down. This helps prevent a second failure during a rebuild, which could result in total data loss.
Finally, test your backups periodically. Choose a few files from your external drive or cloud storage, and try restoring them. It’s the easiest way to make sure your safety net is actually working before you ever need it.
Proactive Tip: Don’t just wait for a scheduled replacement—monitor your drive’s health actively. Tools like CrystalDiskInfo (for Windows) and DriveDx (for Mac) can run S.M.A.R.T. (Self-Monitoring, Analysis, and Reporting Technology) checks to give you an early warning about potential drive failures. These applications track critical metrics like read error rates, temperature, and spin-up time, helping you catch brewing issues before they become catastrophic. Most of these tools are free or low-cost, making them an easy addition to your digital preservation toolkit. Think of them like a health checkup for your digital memory bank—a small investment that can save you from massive headaches down the road.
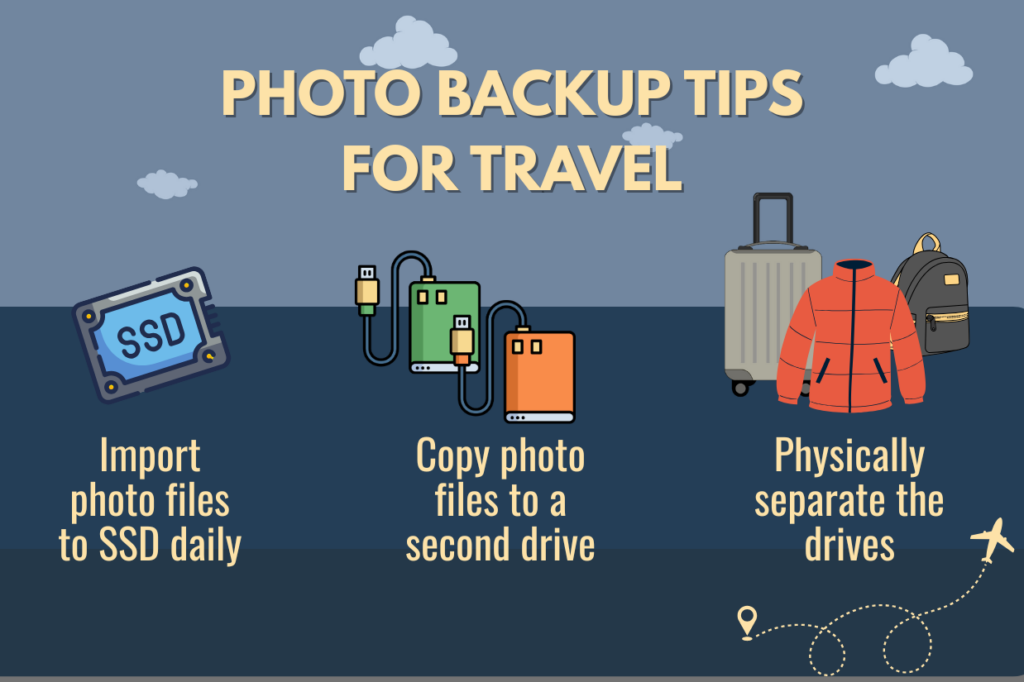
Photo Backup Tips for Traveling Photographers
When you’re on the road, your photo backup system needs to be lightweight, simple, and reliable—especially when internet access isn’t guaranteed. Whether you’re heading out for a few days or a multi-week photo adventure, the goal is to create redundancy without overcomplication.
Here’s how I handle backups while traveling:
- Import your files daily to a fast SSD — I use the Crucial X10 4TB Portable SSD, which is compact, lightweight, and fast enough (up to 2,000MB/s read/write) to keep up with my workflow on the road.
- Manually or automatically copy everything to a second drive — Each evening, I back up the day’s images by duplicating them onto a second drive. It’s straightforward, no extra software needed, though some photographers prefer to use tools like Carbon Copy Cloner or ChronoSync for automation.
- Physically separate the drives — This is a step many overlook. Keep your main drive in your camera bag, and stash the backup in a different location—your jacket pocket, suitcase, or even with a travel companion. When flying, I keep one drive in my carry-on and the other in my checked luggage. If one bag is lost, delayed, or stolen, I still have the other copy.
This approach gives you two physical copies of your work, which is enough coverage for many short trips or low-risk environments. But if you’re photographing an important project or traveling for an extended time, you can also add a cloud-based layer:
- Optional cloud backup of selects — If reliable Wi-Fi is available, I’ll export a few of my most important RAW selects and upload them to Dropbox or Google Drive. That way, I have a copy offsite—even before I return home.
Extra Tips:
- Don’t delete memory cards until you’ve verified both backups.
- Label your drives clearly so you don’t mix up your working drive and backup.
- Start a temporary Lightroom catalog if you’re editing on the go, then merge it into your main catalog after returning home.
Until you return home and plug into your full photo backup system, this method offers a reliable safety net that travels well—and keeps your images protected every step of the way.
Final Thoughts on Photo Backup Solutions
Backup systems aren’t the sexiest part of being a photographer—but they’re one of the most important. You can spend hours chasing the perfect light, composing a thoughtful image, and dialing in your edits… but none of it matters if the files disappear.
If you value your work, protect it. Back up your photos and Lightroom catalog.
The good news? A solid photo backup system doesn’t need to be complicated or expensive. It just requires a little intention and consistency.
For the TL;DR (Too Long; Didn’t Read) Crowd
Here are the key takeaways to keep in mind:
- Use the 3-2-1 backup method: Three copies of your files, on two different types of media, with one copy stored offsite.
- Back up your Lightroom catalog from within Lightroom: Turn on catalog backups and enable integrity checks. It’s one of the simplest ways to catch issues before they become disasters.
- Choose storage that fits your workflow: Whether you’re working with 2TB or 20TB of data, there’s a drive setup that can give you both speed and security.
- Use cloud storage for offsite protection: Backblaze is a great option to automate this layer and keep your files safe—even in the event of fire, theft, or hardware failure.
- When you travel, have a simple backup routine: A primary and secondary drive stored separately can save your trip.
- Replace aging hardware proactively: Drives don’t last forever, and failure is inevitable over time. Plan ahead.
Once you’ve built your system, it becomes second nature—just another part of your creative process, like importing a memory card or exporting your final image.
There’s no perfect system, but there is a right system for you. Start simple, stay consistent, and make sure your photos are protected not just today, but for years to come.
+ show Comments
- Hide Comments
add a comment