

Welcome to the Lightroom & Photoshop Ask Me Anything (AMA) series, where I answer your burning Lightroom and Photoshop questions. To see all the answers, see the main AMA page.

Judith writes:
Hi Chrissy,
After working images in LrClassic and importing them into PS and building a composite I save a PSD or PSB but often it doesn’t save back in Lr. When I go to work on that composite I have to open PS to find the image on the home page. What should I be doing to create a flow between the 2 programs?
thank you – Judith
Understanding the Issue
Thanks for your question! It sounds like you’re experiencing a common issue where Photoshop-edited images aren’t showing up in Lightroom. Here’s what you can do to streamline the process.
When editing images between Lightroom Classic and Photoshop, the key is ensuring that Lightroom knows how to track your Photoshop edits. Lightroom will create a new file (usually PSD or TIFF) that should appear in your Lightroom catalog after you finish your work in Photoshop. If that’s not happening, it’s likely due to either incorrect settings or saving methods.
The Answer: How to Sync Photoshop Edits to Your Lightroom Catalog
To resolve this issue and create a smooth flow between Lightroom Classic and Photoshop, we need to ensure your Lightroom settings are correct. Here’s what to do:
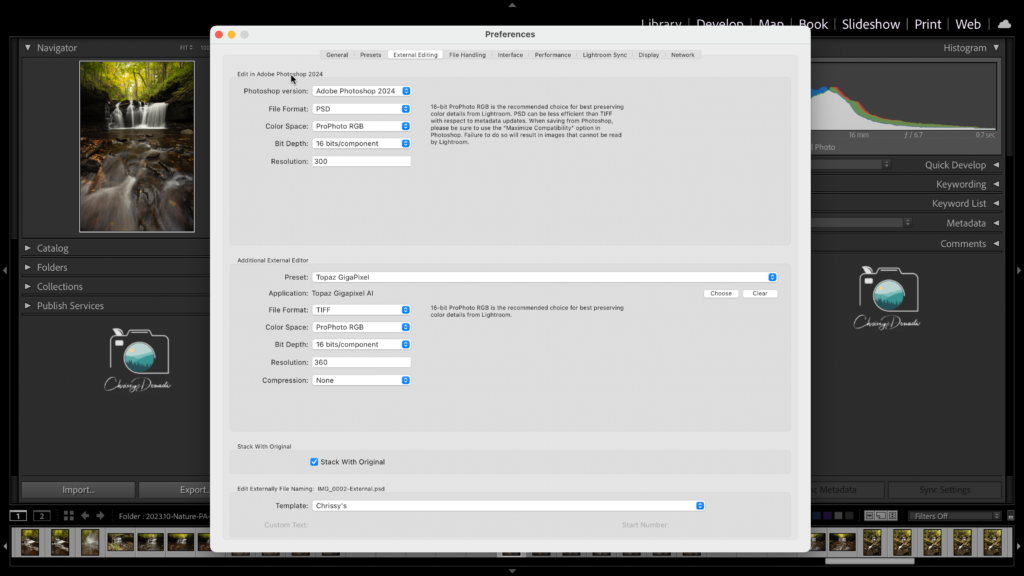
Check Lightroom’s External Editing Preferences:
- In Lightroom Classic, go to Edit > Preferences (Windows) or Lightroom Classic > Preferences (Mac).
- Click on the “External Editing” tab.
- Under “Edit in Adobe Photoshop,” make sure:
- “PSD” as the file format
- “ProPhoto RGB” for the Color Space and “16 bits/component” for the highest quality
- “None” for Compression
- Check “Stack With Original” to keep your files organized.
- Click “OK” to save these changes.
ProPhoto RGB is the preferred color space for maximum flexibility, especially for landscape photographers. This also means you need to set your color space in Photoshop to ProPhoto RGB.
- In Photoshop, go to Edit> Color Settings (on Windows and Mac).
- Under Working Spaces, ensure RGB is set to “ProPhoto RGB”.
Adjust Your Workflow: Sending a Photo from Lightroom to Photoshop
Here’s the ideal way to create a composite using multiple images from your Lightroom catalog:
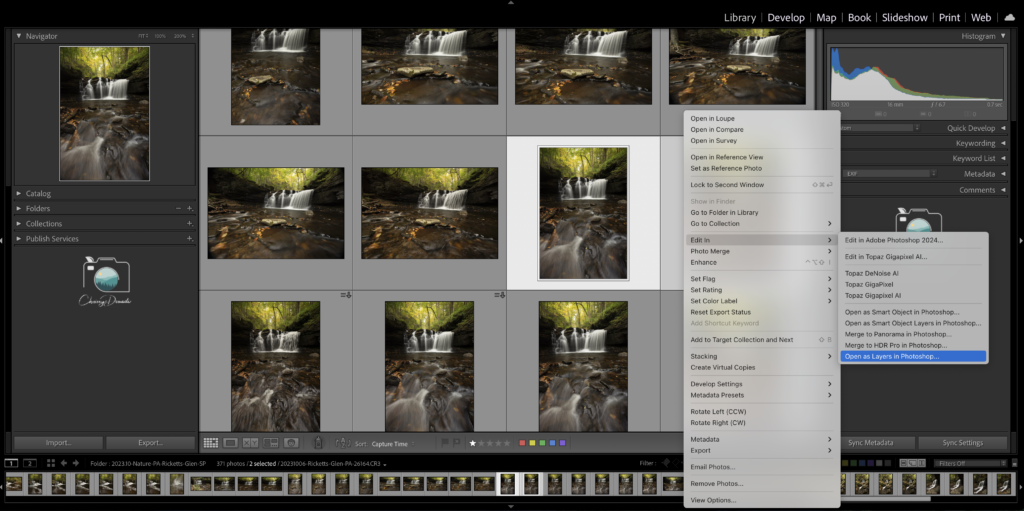
- In Lightroom, select all the photos you want to use in your composite.
- Right-click on the selected photos you want to use for your composite or simple select one photo if you only need to edit one.
- Choose “Edit In” > “Open as Layers in Photoshop” (or “Open as Smart Object Layers in Photoshop” if you prefer working with Smart Objects). This method will open all selected images as separate layers in a single Photoshop document, ready for you to create your composite.
- Work on your composite as usual in Photoshop.
- When finished, simply use File > Save. It’s important not to use “Save As” to ensure Lightroom tracks the edits. After saving, close the file in Photoshop to ensure it returns properly to Lightroom.
By following these steps, Lightroom will create a new PSD file that includes your Photoshop edits. This file will appear in your Lightroom catalog. If you check ‘Stack with Original’ in your Lightroom Preferences under the External Editing tab, Lightroom stacks the new PSD file with the original image (if you’re working with a single image file). If you leave this option unchecked, the new PSD file appears as a separate item next to the original image in your catalog.
A PSD file stands for Photoshop Document standard file format for Photoshop files that preserves all layers, masks, and other Photoshop-specific features but has a size limit of 2 GB. If your file is larger than 2 GB, you’ll be prompted to save it as a PSB, which stands for Photoshop Big. A PSB file can support up to 300,000 pixels in any dimension (that’s huge!). These files are great for large projects, but if you prefer, you can use TIFF as an alternative format that doesn’t have the same size limitations.
Conclusion
By following these steps, you should have no trouble moving files between Lightroom and Photoshop. Consistency in your workflow—starting and ending in Lightroom—will help you keep everything organized and avoid these issues in the future.
Hope this helps!
+ show Comments
- Hide Comments
add a comment