

It’s a new year, and if you’re a photographer that means it’s time to update your copyright metadata in Lightroom. I’m going to show you how to create a copyright preset in Lightroom. At the end of the video, I’ll tell you the three essential elements you must include in all your copyright notices. Plus, I’ll tell you how to automate the process in Lightroom.
Creating a Copyright Preset in Lightroom
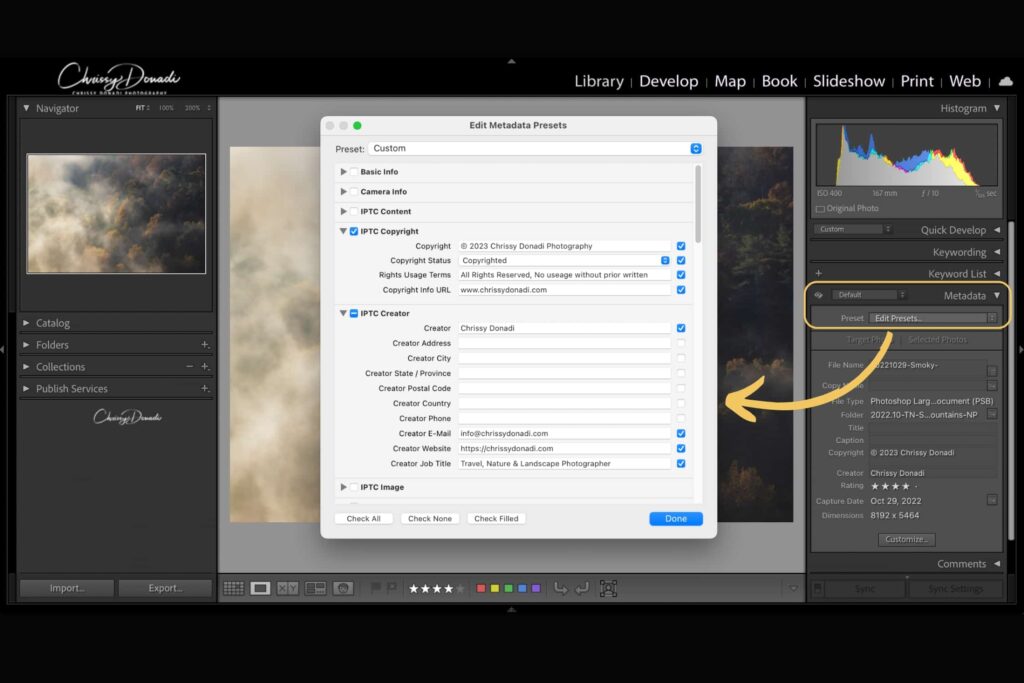
To start, click on the Metadata Panel from the Library Module. Under the Default setting, you’ll see “Preset.” Simply click on that and select Edit Preset.
Now pay attention to the blue checkboxes. Any checked boxes on the right mean that information will be included in the preset. If you fill in your information and leave the box unchecked, no information will be recorded. To automatically give all the boxes within a section a blue checkmark, use the checkbox on the top left of each section.
The Three Essential Elements to Include In Your Photo’s Copyright Notice
This metadata preset is applied to all my images so every photo has a copyright notice embedded in the image file. The three most important elements that should be present in a copyright notice are:
- Either the copyright symbol “©” or the word “copyright”
- The name of the copyright owner. I like to include my email and website address so there is no excuse to be able to contact me
- The year of the first publication
Since the year of first publication is a critical part of copyrighting your photos, that is why I think it is a good step to update your copyright at the start of each new year. If you don’t publish the photo for years after you take it, then perhaps you might choose a different method. Although, I think the majority of photographers will publish the same year they create the image.
Before you leave this box, go back up to the Preset and hit “Save Current Settings As New Preset.” Then, name your new copyright preset and hit save.
How to Automate Your Copyright Preset in Lightroom
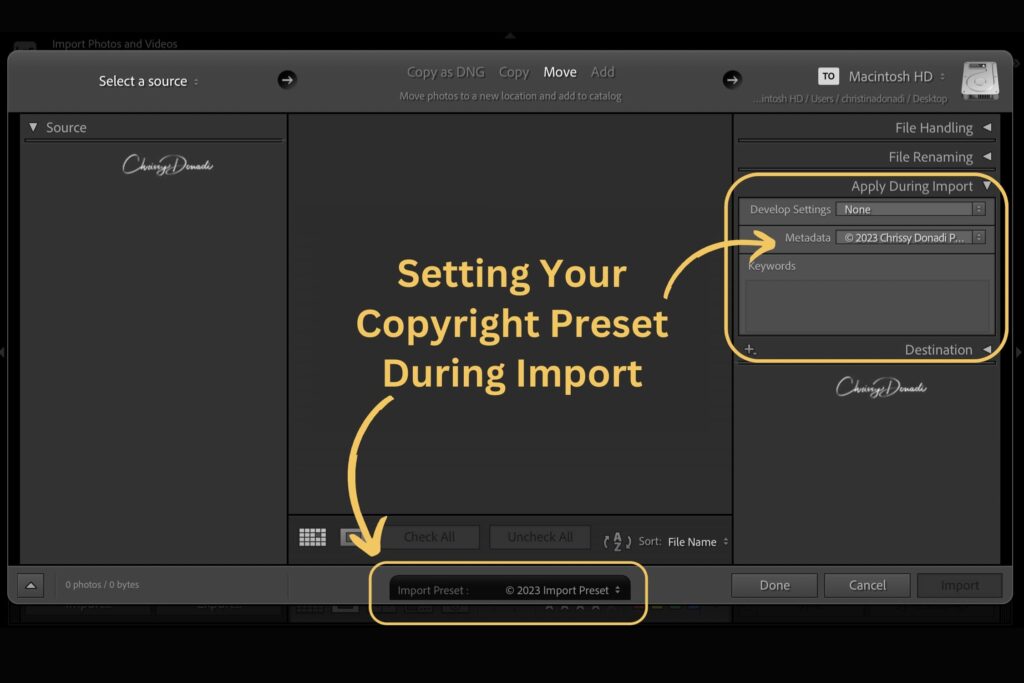
Now, the last step is to automate this for your Lightroom. To do that, from the Library Module, click on the Import Dialog Box.
No matter if you choose to import your images by copying them as a DNG, Copy, Move, or Add them to your catalog, they all contain an Apply During Import Panel on the right-hand side. Here is where you select your Metadata Preset. And that preset will remain with each import unless you change your settings. Even so, I like to create Import Presets with all my favorite import settings. I’ll have different import settings for family photos versus landscape photography photos. To create an import preset, you click on this tiny black strip at the very bottom and select “Save Current Settings As New Preset.” Name your new preset and hit save.
Now, you have the three essential elements to apply a copyright notice to your photos and have it automated to apply to all the images you import in Lightroom. I hope you found this helpful and cheers to a happy Lightroom experience!
+ show Comments
- Hide Comments
add a comment